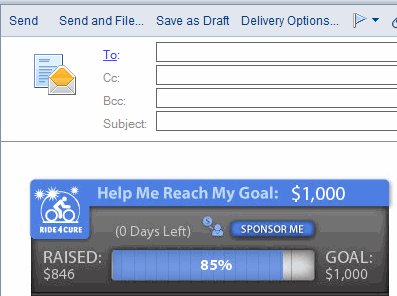
Boundless Fundraising Email Badge Setup
Language:
Operating System:
Unsupported Email Clients
Need assistance? Contact our support team.
Steps
- Sign into your Participation Center or HQ and locate the Email Badge code.
- Select the Code (Ctrl + A)
- Copy the Code (Ctrl + C)
- Open Notepad
- Paste code in Notepad (Ctrl + V)
- Save the Code By following the steps below:
Please make a note of where the file is saved. We recommend saving it to the Desktop.- Click File
- Click Save As
- In File Name Box type: signature.html
- In Save as type select (All Files)
- Locate the file you recently saved (likely Desktop Folder)
- Right-Click on the file
- Click Open With
- Select a Web Browser
- Click (Ctrl + A)
- Click (Ctrl + C)
- Sign in Gmail
- Paste the email Badge in Gmail
- Click Gear Icon
- Click settings
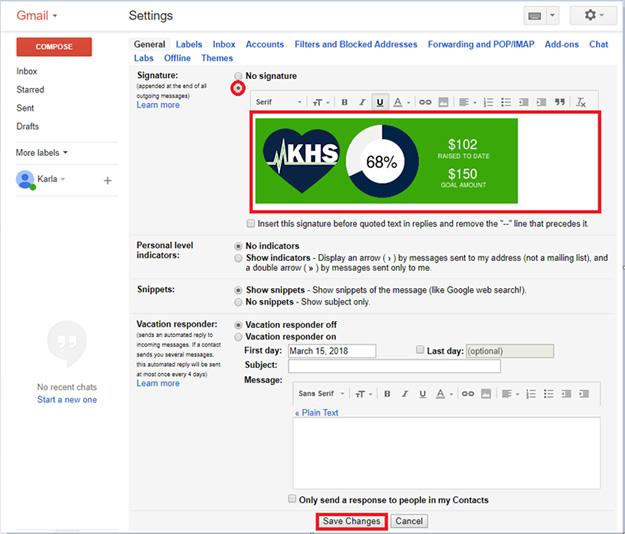
- Click Signature circle
- In Signature Box Click (Ctrl + V)
- Click Save Changes
Need assistance? Contact our support team.

Need assistance? Contact our support team.
Steps
- Sign into your Participation Center or HQ and locate the Email Badge code.
- Select the Code (Ctrl + A)
- Copy the Code (Ctrl + C)
- Open Notepad
- Paste code in Notepad (Ctrl + V)
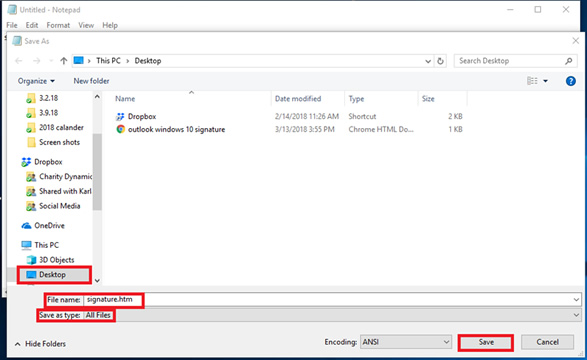
- Save the Code By following the steps below:
Please note where the file is saved. We recommend saving it to Desktop.- Click File
- Click Save As
- In File Name Box type: signature.html
- In Save as type select (All Files)
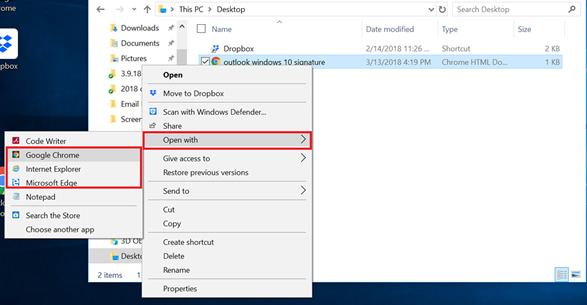
- Locate the file you recently saved (likely Desktop Folder)
- Right-Click on the file
- Click Open With
- Select a Web Browser
- Click (Ctrl + A)
- Click (Ctrl + C)
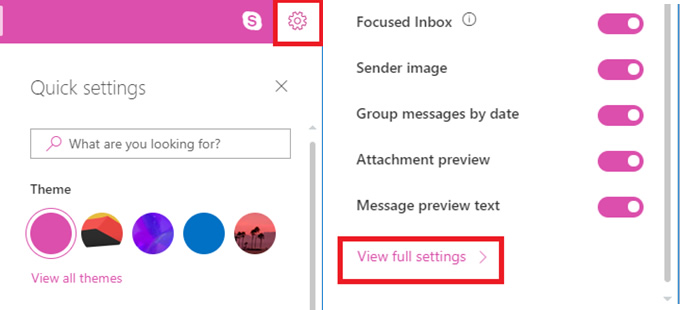
- Sign in Outlook (Hotmail.live.com)
- Paste the email Badge in Outlook (Hotmail.live.com)
- Click Gear Icon
- Click View Full Settings
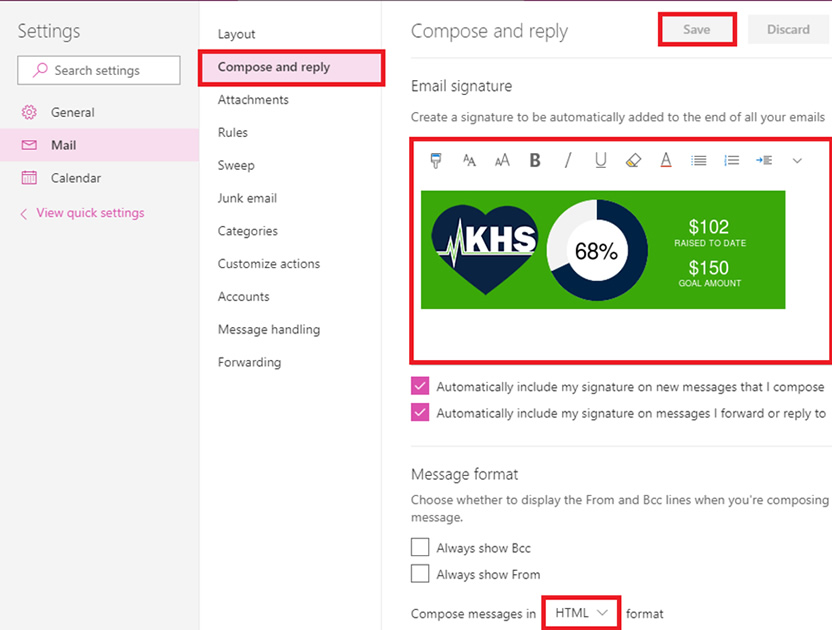
- Click Compose and reply
- In signature box click (Ctrl + V)
- Under Compose messages change it to HTML format
- Click Save
Need assistance? Contact our support team.


Steps
- Sign into your Participation Center or HQ and locate the Email Badge code.
- Select the Code (Ctrl + A)
- Copy the Code (Ctrl + C)
- Open Notepad
- Paste code in Notepad (Ctrl + V)
- Save the Code By following the steps below:
Please note where the file is saved. We recommend saving it to Desktop.- Click File
- Click Save As
- In File Name Box type: signature.html
- In Save as type select (All Files)
- Locate the file you recently saved (likely Desktop Folder)
- Right-Click on the file
- Click Open With
- Select a Web Browser
- Click (Ctrl + A)
- Click (Ctrl + C)
- Sign in Aol Mail
-
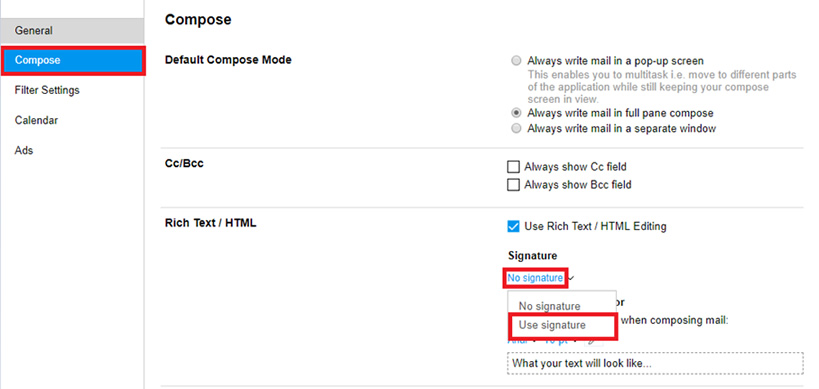
- Click Options
- Click Mail Settings
- Click Compose
- Click Use Signature
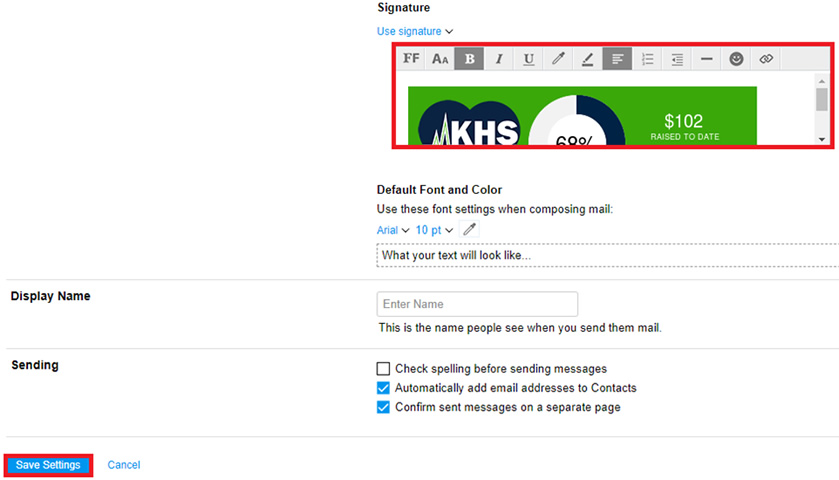
- Paste the email Badge in Aol Mail
- In signature box Click (Ctrl + V)
- Click Save Settings
Need assistance? Contact our support team.


Steps
- Sign into your Participation Center or HQ and locate the Email Badge code.
- Select the Code (Ctrl + A)
- Copy the Code (Ctrl + C)
- Open Notepad
- Paste code in Notepad (Ctrl + V)
- Save the Code By following the steps below:
Please note where the file is saved. We recommend saving it to Desktop.- Click File
- Click Save As
- In File Name Box type: signature.html
- In Save as type select (All Files)
- Locate the file you recently saved (likely Desktop Folder)
- Right-Click on the file
- Click Open With
- Select a Web Browser
- Click (Ctrl + A)
- Click (Ctrl + C)
- Sign in to Yahoo
- Paste the email Badge in New version of Yahoo
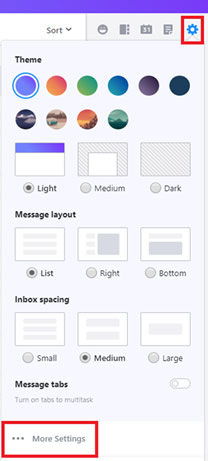
- Click Gear Icon
- Click More Settings
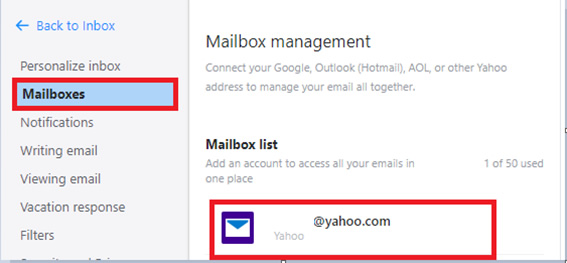
- Click Mailboxes
- Click on the Account Name
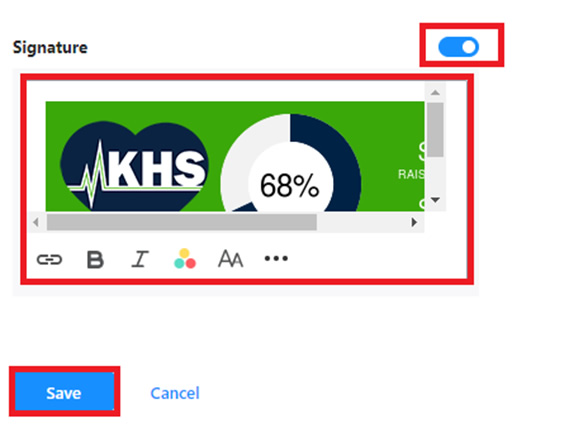
- Click on Button
- In Signature Box Click (CTRL + V)
- Click Save
- Paste the email Badge in Old version of Yahoo
- Click Gear Icon
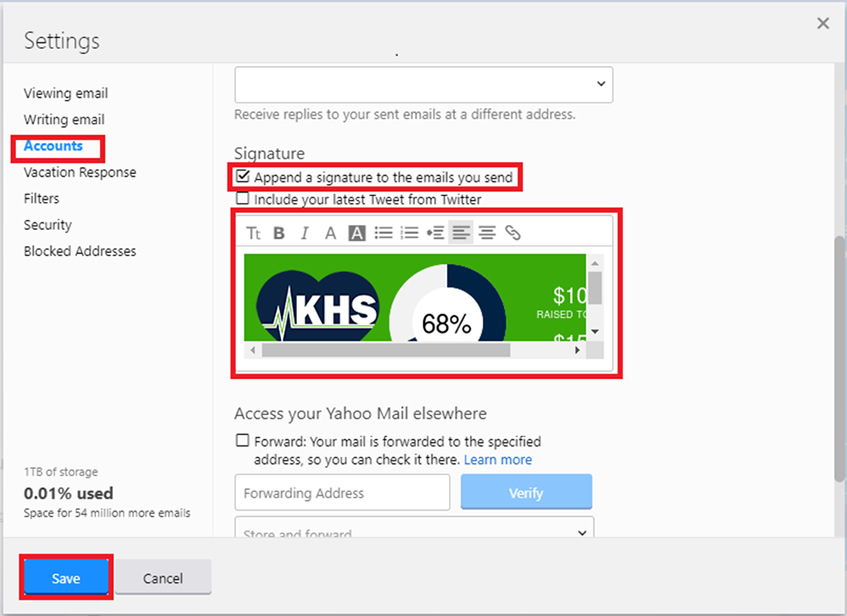
- Click Settings
- Click Accounts
- Click on the Account Name
- Click on Append a signature to the emails you send
- In Signature Box Click (CTRL + V)
- Click Save
Need assistance? Contact our support team.


Steps
- Sign into your Participation Center or HQ and locate the Email Badge code.
- Select the Code (Ctrl + A)
- Copy the Code (Ctrl + C)
- Open Notepad
- Paste code in Notepad (Ctrl + V)
- Save the Code By following the steps below:
Please note where the file is saved. We recommend saving it to Desktop.- Click File
- Click Save As
- In File Name Box type: signature.html
- In Save as type select (All Files)
- Locate the file you recently saved (likely Desktop Folder)
- Right-Click on the file
- Click Open With
- Select a Web Browser
- Click (Ctrl + A)
- Click (Ctrl + C)
- Sign in to Outlook
- Paste the email Badge in Outlook
- Click New Email
- Click Signature Box
- Click Signature
- Click New
- Type the name of the signature you would like to name it.
- In the Email Signature Box Click (CTRL + V)
- Click OK
Need assistance? Contact our support team.


Steps
- Sign into your Participation Center or HQ and locate the Email Badge code.
- Select the Code (Ctrl + A)
- Copy the Code (Ctrl + C)
- Open Notepad
- Paste code in Notepad (Ctrl + V)
- Save the Code By following the steps below:
Please note where the file is saved. We recommend saving it to Desktop.- Click File
- Click Save As
- In File Name Box type: signature.html
- In Save as type select (All Files)
- Locate the file you recently saved (likely Desktop Folder)
- Right-Click on the file
- Click Open With
- Select a Web Browser
- Click (Ctrl + A)
- Click (Ctrl + C)
- Sign in to Outlook
- Open new message
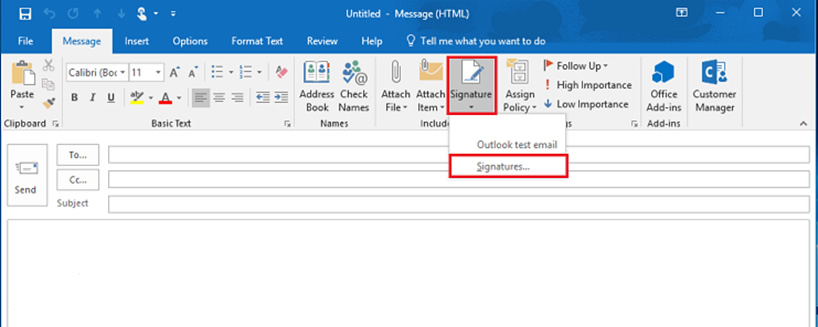
- On Message tab, in Included group, click Signature, and then click Signatures
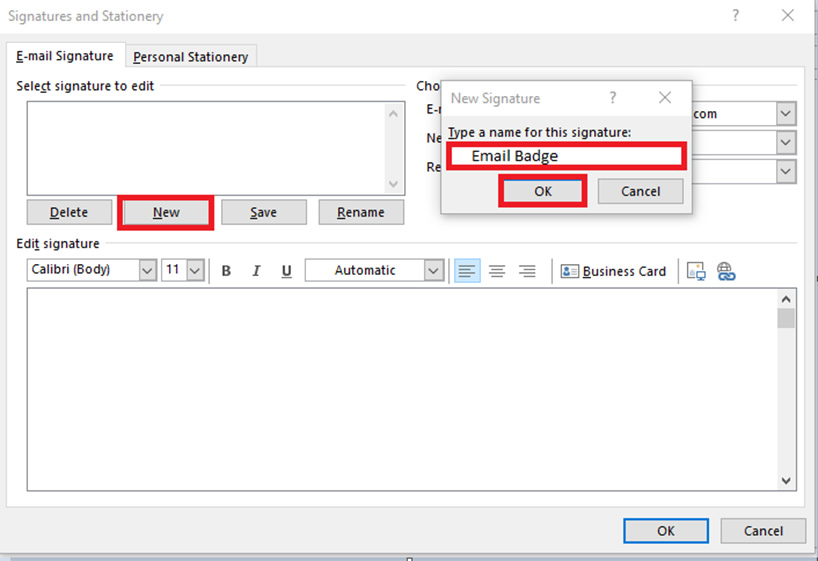
- On E-mail Signature tab, click New
- Type a name for the signature, click OK
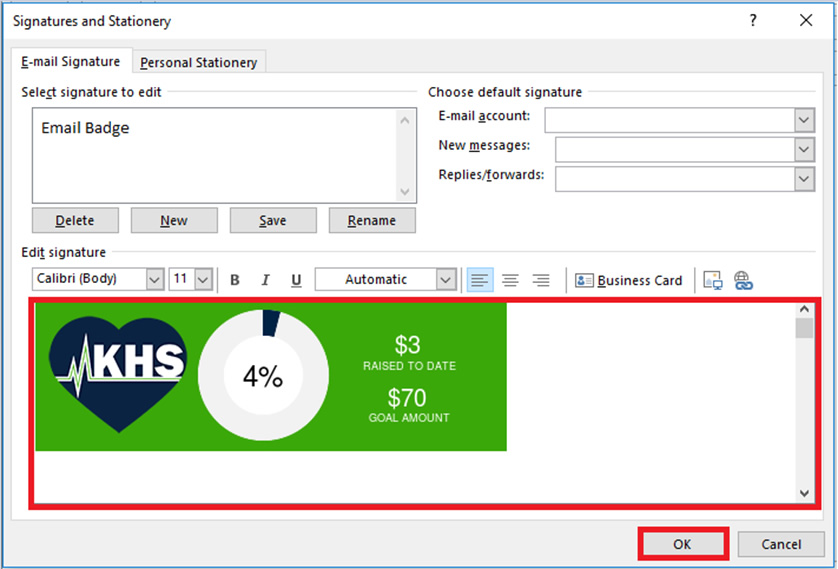
- In Edit signature box click (Ctrl + V)
- Click OK
Need assistance? Contact our support team.


- Open your Participant Center or HQ Page. Click on the email badge button and you should see your email badge with the html code listed below it. Copy the code.
- Open up Microsoft Notepad press ctrl+v to paste the code in it.
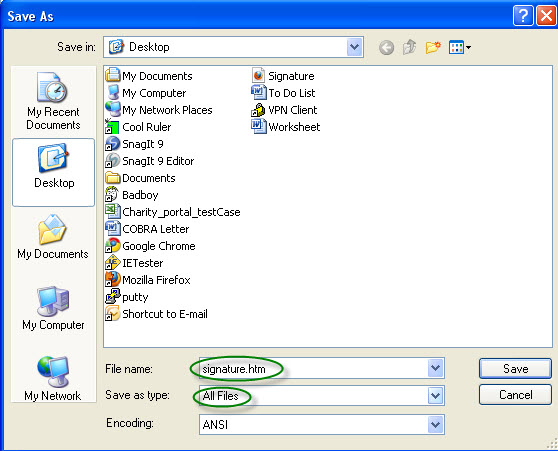
- In the menu bar, select File then Save As
- Set the file name as signature.htm (the .htm MUST be at the end of the file name) and set the Save As Type drop down to All Files
- Make note of the location you are saving the file (the Documents folder is recommended) and click Save
- Open Outlook Express and on the Tools menu, click Options.
- Click the Signatures tab.
- Click New, and then click File.
- Click Browse and locate the file you previously saved in step 5. Click Open.
- Click Save to save your signature.
Need assistance? Contact our support team.
- Open your Participant Center or HQ Page. Click on the email badge button and you should see your email badge with the html code listed below it. Copy the code.
- Open Mozilla Thunderbird and click on Tools then Account Settings
- Find the email address you want to change the signature for and in the Signature text section, click the check box next to Use HTML (e.g., bold)
- Click in the box just below that and paste in the code you previously copied by hitting ctrl+v on your keyboard.
- Click OK
- Write a new email message and you should see your signature populate in the window
Need assistance? Contact our support team.
- Open your Participant Center or HQ Page. Click on the email badge button and you should see your email badge with the html code listed below it. Copy the code.
- Open up Microsoft Notepad press ctrl+v to paste the code in it.
- In the menu bar, select File then Save As
- Set the file name as signature.htm (the .htm MUST be at the end of the file name) and set the Save As Type drop down to All Files
- Make note of the location you are saving the file (the Documents folder is recommended) and click Save
- Open Lotus Notes to your mail application.*
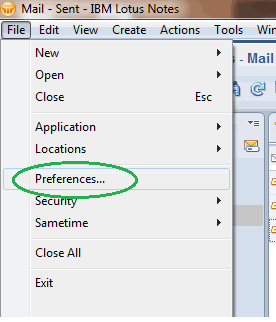
- Select File>Preferences.
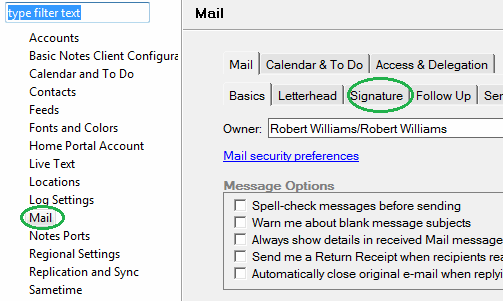
- On the Preferences page select Mail in the left column. Then select the Signature tab at the top of the page.
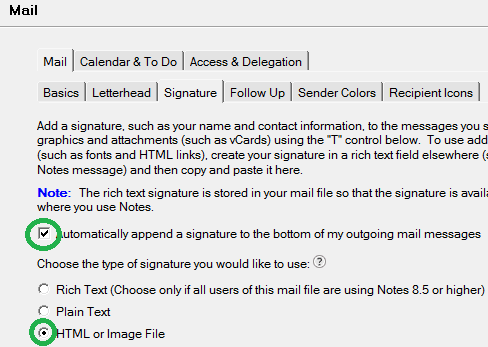
- On the Signature page select the check box “Automatically append a signature…”. Then select the radio button for “HTML or Image File”
- At the bottom of the page enter the location of the .htm file you created in Step 2. Click OK.
- When you open a new message you will see the badge at the bottom of the message. Note- the badge hyperlink will not be live until you send the message. To test it, send a message to yourself or open a sent message in your Sent message box.* Lotus Notes version 8.5 was used for this FAQ. Setup steps may differ based on version.
Need assistance? Contact our support team.
